Please read all the instructions before you start working on the excel sheet.
STEP 1 : DOWNLOAD THE EXCEL SHEET
Update: DEC 3, 2020 | Download the new version of the Arrears Calculator by clicking on the blue button with the calculator icon.
The latest update was aimed at saving your time by reducing the number of entries required to be entered by you. Also made it easier to include the additional stagnation if you’re eligible.
If you are unable to download the calculator, please email me at iamvarunnaik@gmail.com. I will email the excel sheet to you.
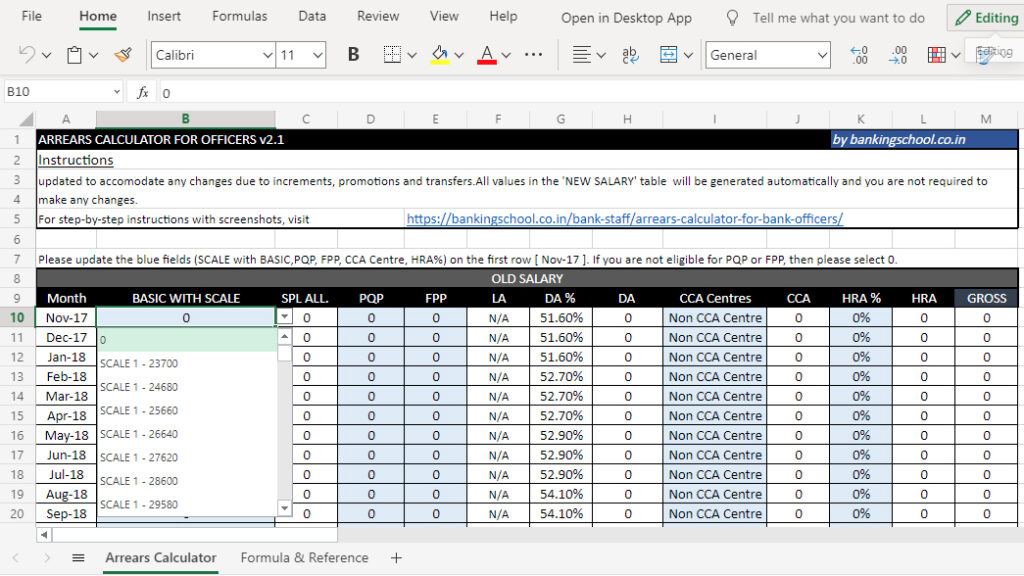
Once downloaded, open the excel sheet and you are going to see a display similar to the attached screenshot below. The look of the excel sheet if you’re using a different version than mine, but don’t worry! The calculator will work perfectly well in your software too.

STEP 2: ENABLE THE EDITING OPTION

This is an optional step. Depending on your software settings, you may or may not see this yellow ribbon on top of your excel worksheet. As long as you can see this ribbon, it won’t allow you to make any changes to the entries in the excel sheet. You need to press ‘enable editing’ button to make this ribbon disappear and start entering the values.
STEP 3: ENTER YOUR BASIC WITH SCALE
We need to start by filling out details for Nov – 17 which is at row #10.

To enter your BASIC, Single-Click / Tap on B10 cell. You will notice that a down arrow button will appear next to the cell. On clicking the down arrow, you will see a drop-down list appear containing all the old BASIC salaries along with scale and stagnation details as options. Select the correct BASIC and Scale (as per 10th BPS, 7th joint note).

Incase of increments or promotions, use the same procedure to manually pick your updated old BASIC salary from the drop-down list next to the corresponding month.
eg: If you receive an increment in the month of April ’18. Single-click / Tap on B15 Cell and select your correct old BASIC from the BASIC with SCALE drop-down list.
If you have joined or retired from service midway then please manually update the months not relevant to you, please pick 0.
if you’re eligible for an additional stagnation as per 11th BPS, please select SCALE – ADD STAG – *YOUR BASIC* from the old salary drop-down list, and the new stagnation will get updated automatically in the new salary table.
Special Allowance field gets calculated automatically as soon as you select BASIC with SCALE
STEP 4: PQP
If you’re not eligible for PQP, please select 0. If you’re eligible for PQP then Single-Click / Tap on the D10 cell. You will notice that a down arrow button will appear next to the cell. On clicking the down arrow, you will see a drop-down list appear containing 670 and 1680 as options. Pick the one that is applicable to you.

STEP 5: FPP
If you’re not eligible for FPP, please select 0. If you’re eligible for FPP then Single-Click / Tap on the E10 cell. You will notice that a down arrow button will appear next to the cell. On clicking the down arrow, you will see a drop-down list appear with FPP options. Pick the one that is applicable to you.

STEP 7: CCA
Your CCA calculations will change depending on whether you belong to Higher Area, Lower Centres, or a Non-CCA Centre. Single-Click / Tap on I10 cell. Select the appropriate cca centre classification from the drop-down. Your CCA will be computed automatically.

In event of a transfer and you move to a different CCA Centre classification, please use the same procedure to navigate to cell corresponding to your month of transfer and update the cell.
FINAL STEP: HRA
If you’re not eligible for HRA, please select 0.
If you’re eligible for HRA, then single-click / tap on K10 cell. Click the down arrow next to the cell and select the appropriate HRA percentage from the drop-down list.

WELL! THAT IS IT!
If everything went as expected, you should see a fully updated NEW SALARY table under your current OLD SALARY table. Scroll past your NEW SALARY table and navigate to Row #90 there it is! in big and bold!
I have added a few extra fields below Arrears receivable for users to calculate deductions.PF/NPS is calculated automatically. There is no drop down for these fields. You can manually enter your correct numbers for AD HOC salary and TDS. Others field is a provision for you to add any other deduction I have not accounted for.

If you don’t see what you’re expected to see at this stage or experiencing a technical issue, drop me an email at this address: iamvarunnaik@gmail.com, and I will try and get back to you as soon as I can.


